| Title | Use XAML to make a calculator that uses resources and styles in VB 2005 and .NET Framework 3.0 |
|---|
| Description | This example shows how to use XAML to make a calculator that uses resources and styles in VB 2005 and .NET Framework 3.0. |
|---|
| Keywords | XAML, VB 2005, Visual Basic 2005, .NET Framework 3.0, gradient, grid, Label, Button |
|---|
| Categories | VB.NET, WPF |
|---|
|
|

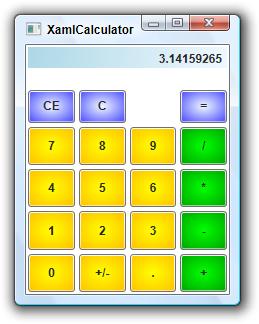
This is a big example so only a few key points are described here. The code shown here was clipped out of the example's XAML code and reformatted slightly to make it simpler. See the complete example program for the actual usage.
XAML allows you to define resources that you can then use to define controls. For example, the following code fragment defines a RadialGradientBrush named brNumber. It starts yellow in the center and fades to orange at the control's edges.
|
|
<Window.Resources>
  <RadialGradientBrush
    Center="0.5,0.5"
    RadiusX="1.0"
    RadiusY="1.0"
    x:Key="brNumber">
    <GradientStop Color="Yellow" Offset="0.0" />
    <GradientStop Color="Orange" Offset="1.0" />
  </RadialGradientBrush>
</Window.Resources>
|
|
|
After you define a resource, you can use it when defining controls. The following code defines a Button containing the text "7" in grid cell (2, 0). The Background attribute indicates that the Button should use the static resource named brNumber for its background.
|
|
<Button
  Background="{StaticResource brNumber}"
  Grid.Row="2"
  Grid.Column="0"
  Margin="2,2,2,2"
  Name="btnNum7" Focusable="False">7</Button>
|
|
|
If you use resources like this to define features such as button backgrounds, you can easily make a lot of buttons use the same background. Later, if you decide to change the backgrounds, you only need to change the resource definition and all of the buttons automatically update appropriately.
The following code defines a RadialGradientBrush named brClear. It then uses that brush to define the style named styClear. The Style includs a Setter that sets an object's Control.Background property to the brClear resource.
|
|
<Window.Resources>
  <RadialGradientBrush
    Center="0.5,0.5"
    RadiusX="1.0"
    RadiusY="1.0"
    x:Key="brClear">
    <GradientStop Color="AliceBlue" Offset="0.0" />
    <GradientStop Color="Blue" Offset="1.0" />
  </RadialGradientBrush>

  <Style x:Key="styClear">
    <Setter Property="Control.Background" Value="{StaticResource brClear}" />
  </Style>
</Window.Resources>
|
|
|
Having defined the Style, you can use it to define controls. The following code defines a Button named btnCe that displays the text "CE" and has Style set to the styClear style. The Click="ClickCe" attribute indicates that the button should call the Visual Basic subroutine ClickCe when it is clicked.
|
|
<Button
  Style="{StaticResource styClear}"
  Grid.Row="1" Margin="2,20,2,2"
  Name="btnCe"
  Click="ClickCe" Focusable="False">CE</Button>
|
|
|
The following code shows the ClickCe subroutine. In this example, the routine simply calls subroutine ProcessCE to do all of the real work.
|
|
Private Sub ClickCE(ByVal sender As Object, ByVal e As System.Windows.RoutedEventArgs)
    ProcessCE()
End Sub
|
|
|
If you use styles like this to define features such as button backgrounds, you can easily make a lot of buttons use the same background. Later, if you decide to change the backgrounds, you only need to change the resource definition and all of the buttons automatically update appropriately.
A style is more powerful than a simpler resource such as a brush. It can also include actions to perform when certain events occur.
This example's Visual Basic code processes key presses and button clicks to implement the calculator. See the code for the details.
Note that this example uses the .NET Framework 3.0 and XAML. To use them, you need to install the Windows SDK (currently called the Windows Vista SDK) available for download on Microsoft's Web site.
|
| |

|
| |
