|
|
|
| Title | Add UAC shields to buttons, menu items, and picture boxes in Visual Basic 2008 |
|---|
| Description | This example shows how to add UAC shields to buttons, menu items, and picture boxes in Visual Basic 2008 |
|---|
| Keywords | UAC, shield, Vista, user access control |
|---|
| Categories | Windows, Software Engineering |
|---|
|
|
In Windows Vista, you are supposed to add a UAC (user access control) shield to buttons that launch processes that require privilege elevation. Unfortunately Microsoft hasn't made this easy to do.
Adding the shield to a button is awkward but not too painful. The AddShieldToButton subroutine does it by sending the button the BCM_SETSHIELD message. Note that the button must have the System FlatStyle and that it must contain a text caption, even if the caption is a single space character.
|
|
' Make the button display the UAC shield.
Public Sub AddShieldToButton(ByVal btn As Button)
    Const BCM_SETSHIELD As Int32 = &H160C

    btn.FlatStyle = Windows.Forms.FlatStyle.System
    SendMessage(New HandleRef(btn, btn.Handle), _
        BCM_SETSHIELD, IntPtr.Zero, CType(1, IntPtr))
End Sub
|
|
|
Microsoft has provided no way to add the shield to anything other than a button so adding it to other things is more work. You could make an image of the shield and just add that where needed but the shield's appearance changes depending on system settings (such as regular or large font size) and might change in future releases of the operating system.
Function GetUacShieldImage gets an image of the system's shield and returns it in a bitmap. You can then add it to menu items, picture boxes, and other controls as appropriate.
This function makes a button with a single space as its text and uses subroutine AddShieldToButton to add the UAC shield. It then calls the button's DrawToBitmap method to make it draw itself onto a bitmap.
Next the code digs through the bitmap to see where the shield image is. It skips the very edges where the button's borders are and discovers the background color for each horizontal row of pixels in the bitmap. As it traverses the image, it records the largest and smallest X and Y coordinates that do not have those colors. That is where the shield is. The code also converts the background pixels to the transparent color.
Finally the code copies the shield into a new bitmap that is sized to fit and returns the new bitmap.
|
|
' Return a bitmap containing the UAC shield.
Public Function GetUacShieldImage() As Bitmap
    Static shield_bm As Bitmap = Nothing
    If shield_bm Is Nothing Then
        Const WID As Integer = 50
        Const HGT As Integer = 50
        Const MARGIN As Integer = 4

        ' Make the button. For some reason, it must
        ' have text or the UAC shield won't appear.
        Dim btn As New Button
        btn.Text = " "
        btn.Size = New System.Drawing.Size(WID, HGT)
        AddShieldToButton(btn)

        ' Draw the button onto a bitmap.
        Dim bm As New Bitmap(WID, HGT)
        btn.Refresh()
        btn.DrawToBitmap(bm, New Rectangle(0, 0, WID, HGT))

        ' Find the part containing the shield.
        Dim min_x As Integer = WID
        Dim max_x As Integer = 0
        Dim min_y As Integer = WID
        Dim max_y As Integer = 0

        ' Fill on the left.
        For y As Integer = MARGIN To HGT - MARGIN - 1
            ' Get the leftmost pixel's color.
            Dim target_color As Color = bm.GetPixel(MARGIN, _
                y)

            ' Fill in with this color as long as we see the
            ' target.
            For x As Integer = MARGIN To WID - MARGIN - 1
                ' See if this pixel is part of the shield.
                If bm.GetPixel(x, y).Equals(target_color) _
                    Then
                    ' It's not part of the shield.
                    ' Clear the pixel.
                    bm.SetPixel(x, y, Color.Transparent)
                Else
                    ' It's part of the shield.
                    If min_y > y Then min_y = y
                    If min_x > x Then min_x = x
                    If max_y < y Then max_y = y
                    If max_x < x Then max_x = x
                End If
            Next x
        Next y

        ' Clip out the shield part.
        Dim shield_wid As Integer = max_x - min_x + 1
        Dim shield_hgt As Integer = max_y - min_y + 1
        shield_bm = New Bitmap(shield_wid, shield_hgt)
        Dim shield_gr As Graphics = _
            Graphics.FromImage(shield_bm)
        shield_gr.DrawImage(bm, 0, 0, _
            New Rectangle(min_x, min_y, shield_wid, _
                shield_hgt), _
            GraphicsUnit.Pixel)
    End If

    Return shield_bm
End Function
|
|
|
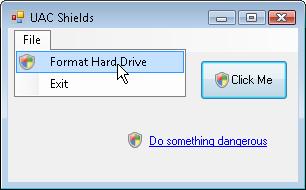
The following code shows how the example program uses these routines. It calls AddShieldToButton to add the shield to the form's button. It then uses GetUacShieldImage to add a shield to a menu item and to a picture box. It finishes by centering a link label next to the picture box.
|
|
Private Sub Form1_Load() Handles MyBase.Load
    ' Add the shield to a button.
    AddShieldToButton(btnClickMe)

    ' Add the shield to a menu item.
    mnuFileFormatHardDrive.Image = GetUacShieldImage()

    ' Add the shield to a PictureBox and
    ' move a LinkLabel next to it.
    picShield.Image = GetUacShieldImage()
    llblDangerous.Location = New Point( _
        picShield.Right + 4, _
        picShield.Top + picShield.Height \ 2 - _
            llblDangerous.Height \ 2)
End Sub
|
|
|
Remember that the shield indicates that the item (button, menu item, link label, or whatever) launches a process that requires privilege elevation. Adding the shield marks the control but does not force privilege elevation. To do that, you need to specify privilege elevation in the new process's manifest or launch it As Administrator.
|
| |
|
| |
|
|


