Home
Search
 
What's New
Index
Books
Links
Q & A
Newsletter
Banners
 
Feedback
Tip Jar
 
C# Helper...
 
XML RSS Feed
Follow VBHelper on Twitter Follow VBHelper on Twitter


MSDN Visual Basic Community


TitleUse a setting that contains a string collection in Visual Basic .NET
DescriptionThis example shows how to use a setting that contains a string collection in Visual Basic .NET.
Keywordssettings, string collection, string list, example, example program, Windows Forms programming, Visual Basic .NET, VB.NET
CategoriesTips and Tricks, Software Engineering
 

A program's settings can have many data types such as int, char, DateTime, and Color. If you want to be able to hold a list of strings, you can make a setting that has type StringCollection.


To create such a setting, open the Project menu and select Properties at the bottom to see the following Properties page, and click the Settings tab.

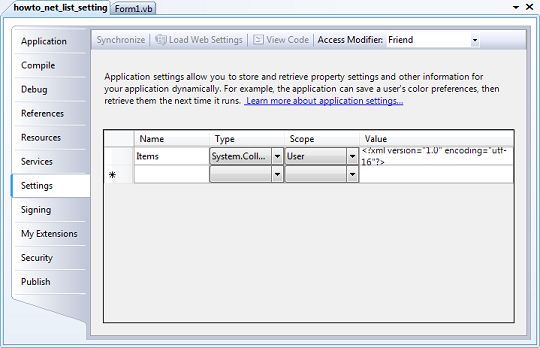
Enter the name you want to give the property in the left text box. Select the data type System.Collections.Specialized.StringCollection in the left dropdown. Use the right dropdown to set the setting's scope to User (not shared) or Application (shared by all users).

If you run the program at this point, the setting isn't actually created so if you try to add or remove an item from the collection you'll get the error "Object reference not set to an instance of an object."

There are a couple of ways you can fix this. First, you can create the setting object at run time if it is null, but this is a bit of a hassle.

A better solution is to click the Value text box on the Settings page. Then click the ellipsis to the right to open a String Collection Editor. If you close this without adding any strings, the Settings window still doesn't actually create the setting object. To prevent that, add a string to the String Collection Editor and click OK. Then open the editor again, remove the string, and click OK. This keeps the setting object but it's empty. If you look closely at the value shown in the Settings page, you'll see:

 
<?xml version="1.0" encoding="utf-16"?>
<ArrayOfString _
    xmlns:xsi="http://www.w3.org/2001/XMLSchema-instance" _
    xmlns:xsd="http://www.w3.org/2001/XMLSchema" />
 
This defines an empty array of strings and that makes the program create the setting object with no entries in it.

After going through all this to create the object, using is is fairly easy. The following code shows how the program lists the strings in the Items setting object.

 
' List the current items.
Private Sub ListItems()
    lstItems.DataSource = My.Settings.Items.Cast(Of _
        String)().ToArray()
    lstItems.SelectedIndex = -1
End Sub
 
This code takes the Items object, invokes its Cast method to convert the items into an IEnumerable of string, turns that into an array, and assigns the result to the lstItems ListBox's DataSource property to display the items. The code then makes sure no item is selected in the list.

If the user clicks on an item in the ListBox, the following code displays it in the program's text box.

 
' Display the selected item.
Private Sub lstItems_SelectedIndexChanged(ByVal sender As _
    System.Object, ByVal e As System.EventArgs) Handles _
    lstItems.SelectedIndexChanged
    If (lstItems.SelectedItem Is Nothing) Then
        txtValue.Clear()
    Else
        txtValue.Text = lstItems.SelectedItem.ToString()
    End If
End Sub
 
The following code shows how the program adds and removes items from the Items collection.
 
' Add an item value.
Private Sub btnAdd_Click(ByVal sender As System.Object, _
    ByVal e As System.EventArgs) Handles btnAdd.Click
    My.Settings.Items.Add(txtValue.Text)
    txtValue.Clear()
    txtValue.Focus()
    ListItems()
End Sub

' Remove an item value.
Private Sub btnRemove_Click(ByVal sender As System.Object, _
    ByVal e As System.EventArgs) Handles btnRemove.Click
    My.Settings.Items.Remove(txtValue.Text)
    txtValue.Clear()
    txtValue.Focus()
    ListItems()
End Sub
 
The program automatically saves changes to the settings when the form closes.


Copyright © 1997-2010 Rocky Mountain Computer Consulting, Inc.   All rights reserved.
  Updated