|
|
|
| Title | Scale a drawing so it fits a target area in Visual Basic .NET |
|---|
| Description | This example shows how to scale a drawing so it fits a target area in Visual Basic .NET. |
|---|
| Keywords | graphics, algorithms, drawing, transformation, transform, scale, scaling, translation, translate, ScaleTransform, TranslateTransform, math, mathematics, Visual Basic .NET, VB.NET |
|---|
| Categories | Graphics, VB.NET |
|---|
|
|

Often when you draw, you need to map a drawing area onto a particular part of a form, either with or without stretching. The following MapDrawing method transforms a Graphics object so it maps a drawing rectangle to a rectangle on the Graphics object.
|
|
' Map a drawing coordinate rectangle to a graphics object
' rectangle.
Private Sub MapDrawing(ByVal gr As Graphics, ByVal _
    drawing_rect As RectangleF, ByVal target_rect As _
    RectangleF, Optional ByVal stretch As Boolean = False)
    gr.ResetTransform()

    ' Center the drawing area at the origin.
    Dim drawing_cx As Single = (drawing_rect.Left + _
        drawing_rect.Right) / 2
    Dim drawing_cy As Single = (drawing_rect.Top + _
        drawing_rect.Bottom) / 2
    gr.TranslateTransform(-drawing_cx, -drawing_cy)

    ' Scale.
    ' Get scale factors for both directions.
    Dim scale_x As Single = target_rect.Width / _
        drawing_rect.Width
    Dim scale_y As Single = target_rect.Height / _
        drawing_rect.Height
    If (Not stretch) Then
        ' To preserve the aspect ratio, use the smaller
        ' scale factor.
        scale_x = Math.Min(scale_x, scale_y)
        scale_y = scale_x
    End If
    gr.ScaleTransform(scale_x, scale_y, _
        System.Drawing.Drawing2D.MatrixOrder.Append)

    ' Translate to center over the drawing area.
    Dim graphics_cx As Single = (target_rect.Left + _
        target_rect.Right) / 2
    Dim graphics_cy As Single = (target_rect.Top + _
        target_rect.Bottom) / 2
    gr.TranslateTransform(graphics_cx, graphics_cy, _
        System.Drawing.Drawing2D.MatrixOrder.Append)
End Sub
|
|
|
The code starts by resetting the Graphics object's transformations to remove any previous transformations.
Next the code finds the center of the drawing rectangle and makes a transformation that translates the drawing so it is centered at the origin. Then when the code scales the drawing in the next step, it remains centered at the origin.
The code then scales the drawing. It first finds scale factors that would make the drawing fill the target output area. Then if the stretch parameter is false, indicating that you don't want to stretch the result, the code sets both scale factors to the smaller of the two. That makes the result as big as possible without distorting it.
The code then calls the Graphics object's ScaleTransform method to scale the drawing. Notice the final parameter Append. This makes the new scale transformation come after the earlier translation. This is very important because the order of the transformations is important. In general you cannot change the order of transformations and produce the same result. (I have no clue why Microsoft decided the default should be to prepend new transformation before older ones but that's what you get if you omit this final parameter.)
At this point the Graphics object is set up to make the drawing at its final scale centered at the origin. The code now adds a transformation to move the center of the drawing (the origin) to the center of the target area. Again notice that the code appends this transformation.
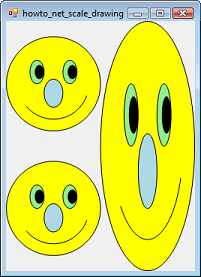
The following code shows how the program uses the MapDrawing method to draw the picture shown above.
|
|
' Draw some smiley faces.
Private Sub Form1_Paint(ByVal sender As Object, ByVal e As _
    System.Windows.Forms.PaintEventArgs) Handles Me.Paint
    e.Graphics.SmoothingMode = _
        System.Drawing.Drawing2D.SmoothingMode.AntiAlias

    Dim smiley_rect As New RectangleF(-1, -1, 2, 2)
    Dim wid As Single = (Me.ClientSize.Width - 1) / 2
    Dim hgt As Single = (Me.ClientSize.Height - 1) / 2

    ' Draw in the upper left quarter.
    MapDrawing(e.Graphics, smiley_rect, New RectangleF(0, 0, _
        wid, hgt), False)
    DrawSmiley(e.Graphics)

    ' Draw in the lower left quarter.
    MapDrawing(e.Graphics, smiley_rect, New RectangleF(0, _
        hgt, wid, hgt), False)
    DrawSmiley(e.Graphics)

    ' Draw in the right side.
    MapDrawing(e.Graphics, smiley_rect, New RectangleF(wid, _
        0, wid, 2 * hgt), True)
    DrawSmiley(e.Graphics)
End Sub
|
|
|
The DrawSmiley method uses ellipses and an arc to draw a smiley face in the area (-1, -1)-(1, 1). It's straightforward so it isn't shown here. Download the example to see how it works.
The code makes a RectangleF named smiley_rect to represent the area where the smiley face is drawn. It also makes variables wid and hgt to measure half of the form's client area (minus 1 so things fit at the edges).
Next the code calls MapDrawing and DrawSmiley to draw the smiley face on different parts of the form. Notice that the first two calls to DrawSmiley use false for their last parameters so those smiley faces are not distorted. In the final call to DrawSmiley, this parameter is true so the smiley is stretched to fill the entire target area.
|
| |

|
| |
|
|
